 how-to
How to Illuminate Backyard Trees: Professional Design Guide
Table of Contents
- Why Professional Tree Lighting Transforms Your Backyard
- Best Uplights for Trees: Choosing the Right Fixtures
- Where to Place Landscape Lights Around a Tree
- Understanding Landscape Lighting Beam Angles
- Outdoor Tree Lighting Ideas: Design Techniques That Work
- Color Temperature and Light Distribution for Natural Beauty
- Professional Installation vs. DIY: Why It Matters
- Frequently Asked Questions
Last Updated: October 13, 2026
Why Professional Tree Lighting Transforms Your Backyard
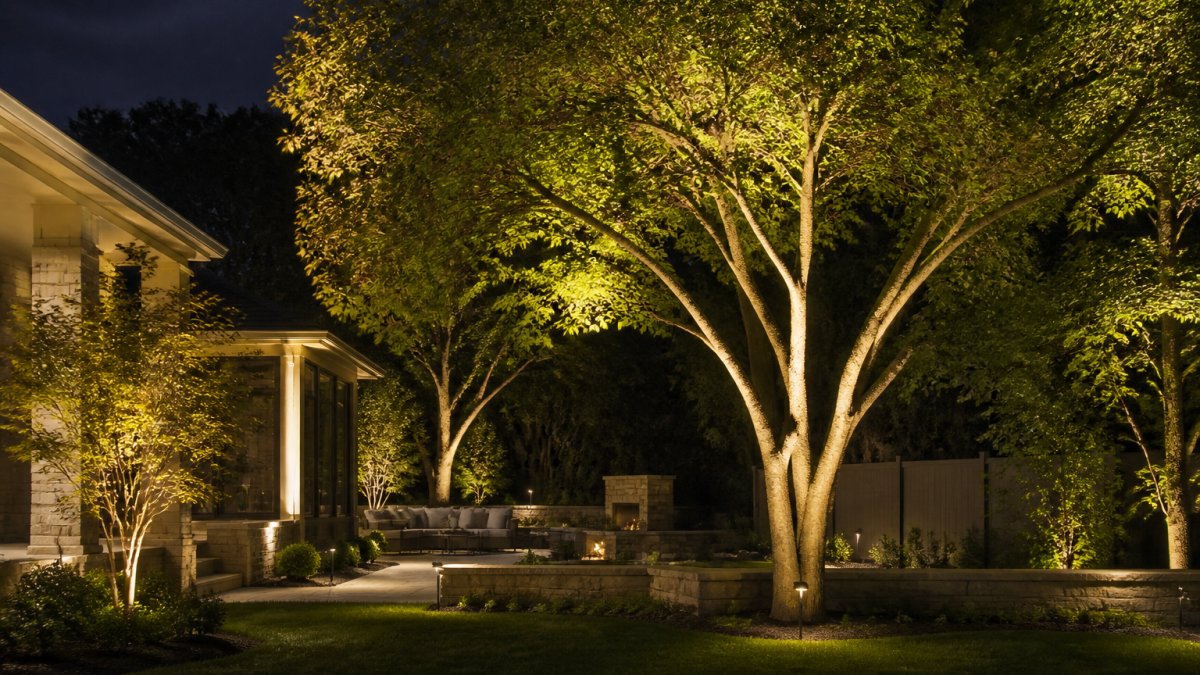
When you illuminate backyard trees with thoughtful design, the trees become focal points, your landscape gains depth, and your home feels larger and more inviting after dark.
At Lightscape Design & Installation, we've spent years perfecting how to illuminate backyard trees for St. Louis homeowners. The difference between amateur lighting and professional design isn't brightness, it's intentionality: understanding beam angles, fixture placement, and how light interacts with bark, branches, and foliage.
Best Uplights for Trees: Choosing the Right Fixtures
Uplighting is the foundation of tree illumination. It places light sources near the ground, aimed upward to reveal the tree's structure, texture, and natural form. But "uplight" is a category, not a specification, the fixture that flatters a 15-foot dogwood will wash out a 50-foot oak. The difference comes down to beam angle, lumen output, color temperature, and construction quality.
Match the fixture to the tree, not the other way around
A simple height-and-density read gets you most of the way to the right fixture:
- Small ornamental trees (8-15 ft), open canopy, a single narrow-beam uplight (15°-25°) placed 2-3 ft from the trunk. Wide beams spill past the canopy and light the neighbor's fence.
- Mid-size trees (15-30 ft), moderate canopy, one or two fixtures at 25°-35°, positioned 3-5 ft out. A 35° beam is usually the sweet spot: focused enough to define branch structure, wide enough to avoid a harsh spotlight look.
- Large shade trees (30-60 ft+), dense canopy, two to four fixtures at 15°-30°, set 5-8 ft from the base and cross-aimed. Narrow beams concentrate light where it needs to travel.
The specifications that actually matter
- Beam angle (15°-60°), the single biggest lever on how a tree reads. Narrow = dramatic, sculptural, high contrast. Wide = soft, ambient, lower contrast. Adjustable-beam fixtures let you tune this on site and re-tune it as the tree fills in.
- Lumen output, more is not better. Over-lighting flattens texture and creates glare. The goal is enough output to reveal form at the canopy, not to make the tree the brightest object on the block.
- Color temperature (2700K-3000K), warm white reads as natural and complements bark and foliage. Cool white (4000K+) reads as commercial and washes out the greens and browns that make a tree look alive.
Why integrated LED matters for trees specifically
USA-made fixtures with integrated LED technology offer real advantages here. There are no replaceable bulbs to maintain or burn out, and no socket for moisture to reach. The LED is built into the fixture and paired with a matched driver, and quality manufacturers like those we specify offer customized wattages and beam spreads so you're not over- or under-lighting your trees.
Look for fixtures that offer:
- Adjustable beam angles (typically 15° to 60°) for different tree sizes
- Warm color temperature (2700K-3000K) for natural, inviting light
- Durable construction rated for outdoor use
- Low-glare design with shielding or a honeycomb lens to control spill
A poorly designed uplighter creates harsh shadows and uneven light, while a professional-grade fixture reveals the tree's character and keeps doing it for decades.
Where to Place Landscape Lights Around a Tree
Fixture placement makes the difference between a beautifully lit tree and one that looks washed out or overly dramatic.
Ground-Level Placement for Uplighting
Place uplights at ground level, 3 to 6 feet from the tree's base, a 40-foot oak needs fixtures farther out than a 20-foot maple. Angle the fixture upward at 45° to 60° to reveal the trunk and lower branches while light washes up through the canopy; too shallow loses trunk definition, too steep looks artificial. Our Landscape Lighting Design & Installation service includes precise placement calculations that account for tree size, canopy density, and your viewing angles from the patio, windows, and street.
Canopy and Branch Positioning
For trees with significant branch structure, consider a secondary fixture mounted higher up on a nearby structure or in a neighboring tree. A light mounted 8 feet up on a pergola or fence can create dramatic canopy lighting that reveals branching patterns invisible from ground level. The key is avoiding light that shines into neighbors' windows or creates glare, professional designers think about sight lines and spillage, details DIY installations often miss.
Understanding Landscape Lighting Beam Angles
Beam angle determines how light spreads from your fixture. A narrow beam (15°-30°) creates a focused spotlight; a wide beam (45°-60°) washes a larger area with softer light. For tree uplighting, the right angle depends on tree height (taller trees need narrower beams to reach the canopy), canopy density, distance from the fixture, and the surrounding landscape.
Outdoor Tree Lighting Ideas: Design Techniques That Work
Several proven techniques create compelling tree lighting, each working differently depending on your tree's structure and your goals.
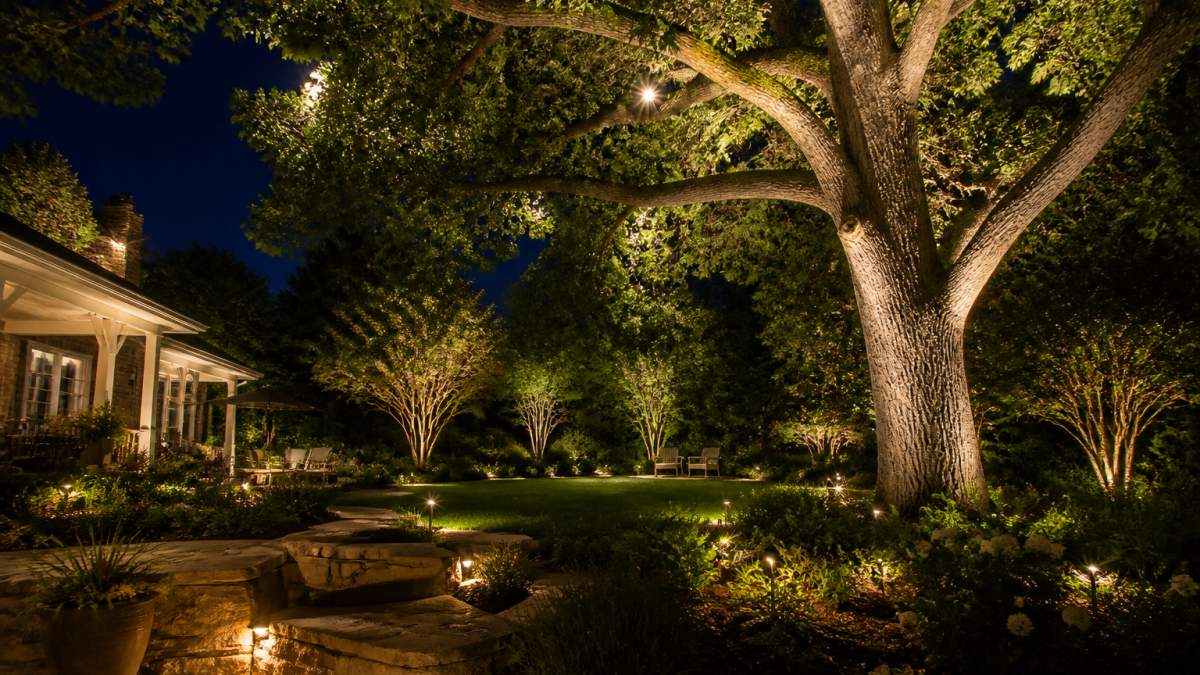
Cross-Lighting for Depth and Dimension
Cross-lighting means illuminating your tree from multiple directions, two, three, or even four fixtures positioned around the perimeter, which prevents the flat, one-dimensional look of single-source lighting and reveals texture and form. For a 30-foot oak in Chesterfield or Wildwood, we typically use three uplights positioned 120° apart, each aimed slightly inward so the beams cross within the canopy.
Moonlighting and Downlighting from the Canopy
Moonlighting mimics natural moonlight filtering through branches: a fixture mounted high in a nearby tree or on a tall structure aims downward through the canopy, creating soft, dappled light on the ground below. It's about soft illumination beneath the tree, perfect for pathways, seating areas, or nighttime visibility. Downlighting from within the canopy works similarly for trees with open branching, a fixture tucked into the upper branches creates a dramatic waterfall effect of light.
Trunk Wrapping and Bark Texture Highlighting
Some trees have stunning bark texture, an old oak with deep, furrowed bark becomes a sculptural element when lit properly. Uplighting from close to the base (2-3 feet away) at a steep angle (60°-75°) rakes light across the surface, revealing every ridge and crevice. On smooth or pale bark, the trunk seems to glow from within.
Request a Lighting Consultation Today →
Color Temperature and Light Distribution for Natural Beauty
The color of your light matters as much as its placement. Warm white light (2700K-3000K) looks natural, complements foliage, makes bark look rich, and creates an inviting atmosphere, while cool white (4000K+) looks harsh and artificial, the light of parking lots, not backyards. Professional fixtures maintain consistent color temperature without shifting or fading, whereas cheaper fixtures use lower-quality LEDs that drift toward blue or yellow as they age.
Professional Installation vs. DIY: Why It Matters
DIY tree lighting seems simple. Buy fixtures. Dig holes. Plug them in. In reality, a low-voltage landscape lighting system is a small electrical installation, and the details that separate a system that lasts twenty years from one that fails in three are invisible once the trench is closed.
Electrical safety and code-aware installation
Low-voltage systems are safer than line voltage, but "safer" is not "unregulated." A few fundamentals matter:
- Outdoor-rated equipment only. Fixtures, cable, connectors, and transformers should all be listed for wet locations; indoor-rated components fail quickly outdoors and can create shock and fire hazards.
- GFCI protection. Any outdoor receptacle feeding the transformer should be GFCI-protected, standard electrical practice and a common miss on DIY installs.
- Transformer sizing. The transformer must be sized for the connected load with headroom to spare, typically at least 20% above total fixture wattage. Undersized transformers run hot and dim.
- Voltage drop. Low-voltage systems lose voltage over distance, so a fixture at the end of a long run shows up dim and warm-shifted. Professional installers calculate voltage drop and shorten runs, use heavier-gauge cable, or split the system across multiple home runs.
Never bury a connection that isn't rated for direct burial, and never splice low-voltage cable with wire nuts alone. Moisture wicks into the splice, corrodes the copper, and the fixture goes dark, usually within a season.
Fixture aiming is a skill, not a step
A fixture that's off by 5° can completely change how a tree looks. Professional installers aim, step back, view the tree from the patio, the kitchen window, and the street, then re-aim. They check for glare from seated eye level and confirm the beam reaches the canopy without spilling onto the neighbor's second story. This iterative aiming is the single biggest visual difference between a professional install and a DIY one.
Long-term performance is designed in
Fixtures need to be secured against frost heave, ground movement, and string trimmers, with wiring protected from UV and moisture and connections sealed. Trees grow, too, a fixture aimed at a trunk this year may hit a branch next year, and a system not designed for re-aiming becomes a maintenance headache. Professional systems, especially those using USA-made integrated LED fixtures with our 20-year limited warranty, are built to withstand years of outdoor exposure and installed so they can be serviced and re-aimed without digging up the yard.
Maintenance and adjustments are part of the system
Trees grow, foliage changes seasonally, and fixtures may need re-aiming after a storm or landscaping project. A professional installation plans for that with accessible connections, labeled home runs, and a service relationship that keeps the system performing. A DIY system might work for a season or two, but as fixtures degrade, connections corrode, and trees grow, it deteriorates, by year three or four, the homeowner faces inconsistent light and failed fixtures.
A note on light pollution and neighbors
Good tree lighting is considerate lighting. Shielded fixtures, careful aiming, and timers or astronomical controls keep light on the tree and off the neighbor's windows, the street, and the night sky.
Professional installation is not about the fixtures alone. It's about voltage drop calculations, sealed connections, GFCI protection, iterative aiming, and a maintenance plan, the details that determine whether your trees look beautiful for one season or for twenty years.
Professionally designed tree lighting reveals what your landscape truly is, extends your outdoor living into the evening, and adds safety and value to your property. Our Architectural Outdoor Lighting designs, American-made fixtures, customized beam spreads, and professional installation ensure your trees look beautiful year after year.
Ready to see what your backyard can become after dark? Schedule a complimentary nighttime lighting demonstration with our team. We'll show you exactly how professional tree lighting works and create a custom design for your property.
Frequently Asked Questions
How do you illuminate backyard trees to avoid shadows and dense foliage?
Professional tree lighting uses cross-lighting from multiple angles and uplighting positioned at the base to reach through dense canopies. Choosing the right beam angle (typically 25-40 degrees for uplighting) and placing fixtures strategically around the tree's perimeter ensures light penetrates branches and foliage rather than creating flat shadows. American-made integrated LED fixtures with customized beam spreads allow precise control over light distribution, highlighting trunk, bark texture, and branch structure without wasting light.
What beam angle is best for landscape lighting around trees?
Beam angles between 25 and 40 degrees work best for most tree uplighting applications. Narrower beams (25-30 degrees) create focused accent lighting on trunks and focal trees, while wider beams (35-40 degrees) provide broader coverage for larger canopies or multiple trees. The ideal angle depends on tree height, canopy density, and how far the fixture sits from the trunk. Professional designers customize beam spreads to match your specific trees and desired lighting effect.
Can you add landscape lighting to an existing backyard without major renovation?
Yes. Professional landscape lighting installation integrates with existing hardscapes, patios, and plantings. Fixtures mount at ground level, within trees, or along pathways without requiring extensive digging or structural changes. Integrated LED systems eliminate the need for bulb replacements and simplify wiring. A complimentary on-site consultation reveals how to enhance your current backyard layout with uplighting, accent lighting, and pathway illumination that complements your property's natural features.
Why is professional installation better than DIY tree lighting?
Professional installation ensures proper electrical safety, code-compliant wiring, and precise fixture aiming that creates balanced, natural-looking light. Professionals understand beam angles, color temperature consistency, and cross-lighting techniques that DIY setups often miss. USA-made fixtures with integrated LED technology and a 20-year limited warranty provide durability and reliability. Professional designers also account for tree growth, seasonal changes, and neighbor considerations, details that prevent costly mistakes and ensure your lighting performs beautifully for decades.